Szablon: TAP servermigration: Różnice pomiędzy wersjami
Z Elproma Wiki Knowledge Base
(Utworzono nową stronę "The {{{model}}} Thingsboard <b>Server migration</b> {{{model}}} instruction: * Firstly you’ve to log in to Elproma Thingsboard with credential received from Elproma. ** Go to Dashboard and click "CHANGE SERVER" 800px|border|class=tlt-border ** Enter your Thingsboard Domain and port and click restart all devices 800px|border|class=tlt-border * Secondly you need to install Thingsboard on y…") |
|||
| (Nie pokazano 11 wersji utworzonych przez 2 użytkowników) | |||
| Linia 1: | Linia 1: | ||
The {{{model}}} Thingsboard <b>Server migration</b> {{{model}}} instruction: | The {{{model}}} Thingsboard <b>Server migration</b> {{{model}}} instruction: | ||
<ol> | |||
<li>Firstly you’ve to log in to Elproma Thingsboard with credential received from Elproma. | |||
[[File:rbvnd-lite_2g_tap_sm1.png|800px|border|class=tlt-border]] | <ol style="list-style-type:lower-alpha"> | ||
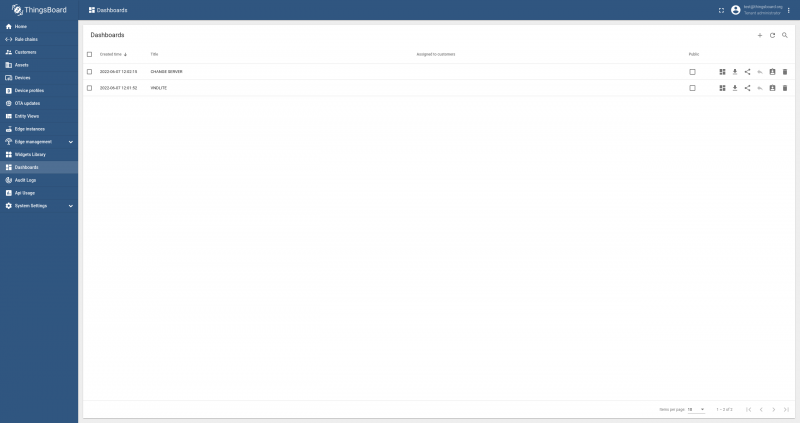
<li>Go to Dashboard and click "CHANGE SERVER"<br> | |||
[[File:rbvnd-lite_2g_tap_sm1.png|800px|border|class=tlt-border]] | |||
</li> | |||
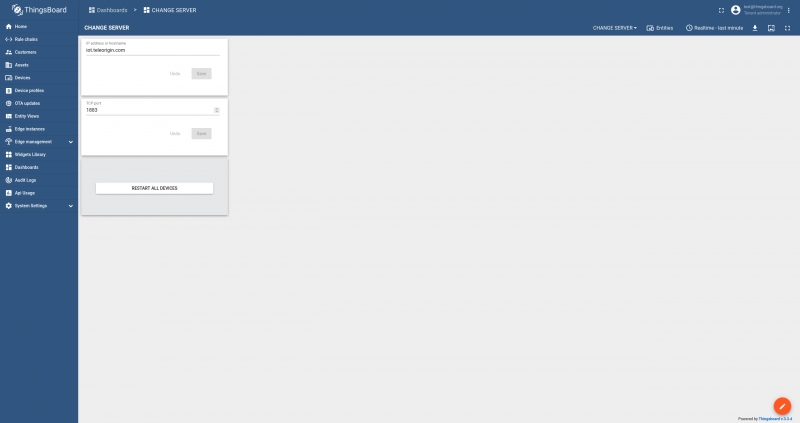
<li>Enter your Thingsboard Domain and port and click restart all devices<br> | |||
[[File:rbvnd-lite_2g_tap_sm2.png|800px|border|class=tlt-border]] | |||
</li> | |||
</ol> | |||
</li> | |||
<li>Secondly you need to install Thingsboard on your server. You have two different option: | |||
<ol style="list-style-type:lower-alpha"> | |||
<li>Official release from: https://github.com/thingsboard/thingsboard/releases/ | |||
</li> | |||
<li>Elproma release (only linux standalone versions) from: [[LINK]]. | |||
Our release has couple improvements for using with RBVND-Lite: | |||
Default "shared attribute" in device importing form. | |||
Changes in multiple input widget – possibility to change one parameter in all devices simultaneously. | |||
</li> | |||
<li>Manual for both installation: | |||
https://thingsboard.io/docs/user-guide/install/installation-options/ | |||
</li> | |||
</ol> | |||
</li> | |||
[[File:rbvnd- | <li>After installation you need to import your devices list to Thingsboard. | ||
<ol style="list-style-type:lower-alpha"> | |||
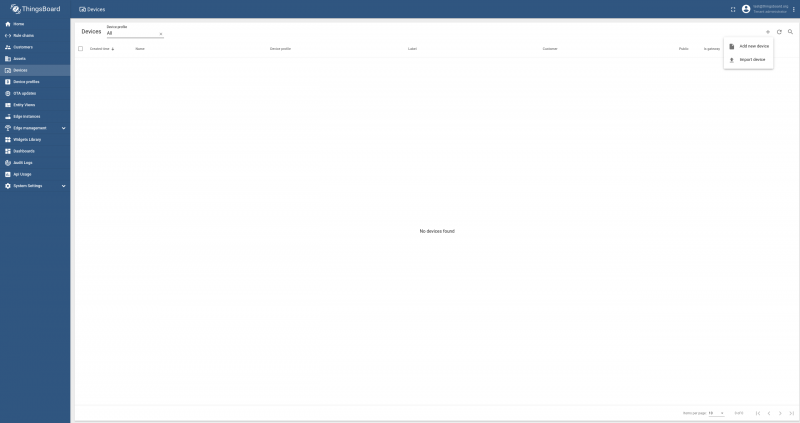
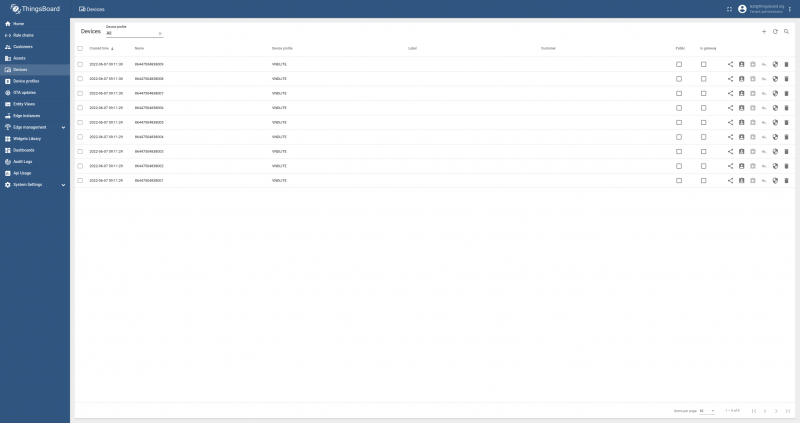
<li>Go to device menu, click plus sign and "Import device"<br> | |||
[[File:rbvnd-lite_2g_tap_sm3.png|800px|border|class=tlt-border]] | |||
</li> | |||
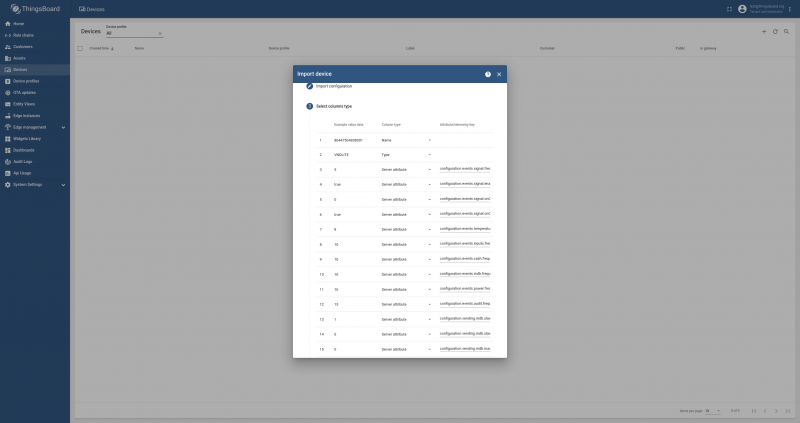
<li>Upload your csv device list file (you receive it from Elproma)<br> | |||
[[File:rbvnd-lite_2g_tap_sm4.png|800px|border|class=tlt-border]] | |||
</li> | |||
<li>In second step you need to click "Continue" | |||
</li> | |||
<li> | |||
In third step if you are using official release you need to change all "Server attribute" to "Shared attribute". In Elproma release you can skip this part. Next you have to change "configuration.server.tcp.host" parameter from iot.teleorigin.com to your domain or ip address and after it click "Continue".<br> | |||
[[File:rbvnd-lite_2g_tap_sm5.png|800px|border|class=tlt-border]] | |||
</li> | |||
<li>Fourth and fifth step you can skip and click "Continue"<br> | |||
[[File:rbvnd-lite_2g_tap_sm6.png|800px|border|class=tlt-border]] | |||
</li> | |||
</ol> | |||
</li> | |||
<li>If you need to display live data and EVA-DTS audits you can use our example dashboard. | |||
<ol style="list-style-type:lower-alpha"> | |||
<li>Download dashboard from https://cloud.elpromaelectronics.com/index.php/s/nQAxcSkQtqGkD7k | |||
</li> | |||
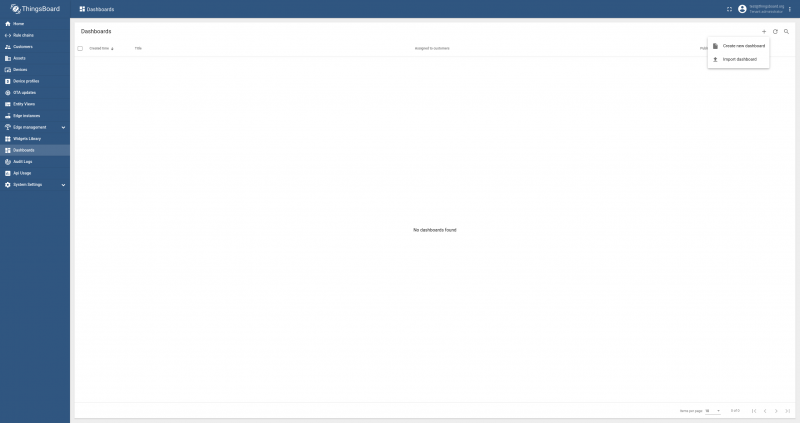
<li>Go to Dashboard menu, click plus sign and "Import dashboard"<br> | |||
[[File:rbvnd-lite_2g_tap_sm7.png|800px|border|class=tlt-border]] | |||
</li> | |||
<li>Select file and click “Import” | |||
</li> | |||
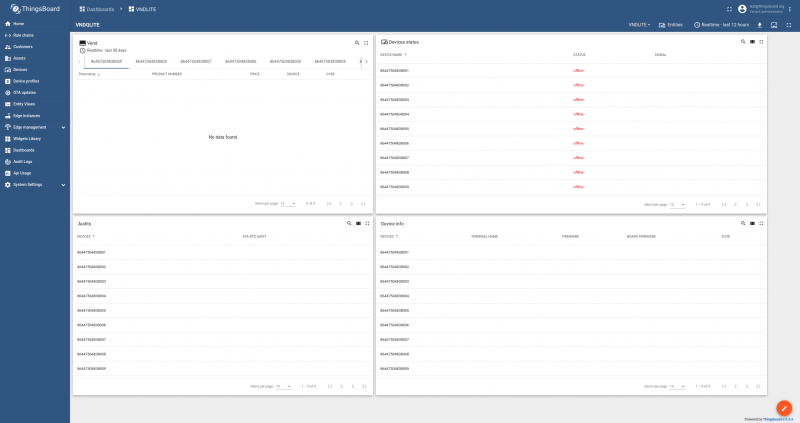
<li>Imported dashboard automatically connect to imported devices and present parameters.. <br> | |||
[[File:rbvnd-lite_2g_tap_sm8.png|800px|border|class=tlt-border]] | |||
</li> | |||
</ol> | |||
</li> | |||
</ol> | |||
[[Category:{{{model}}} User Manual]] | [[Category:{{{model}}} User Manual]] | ||
Aktualna wersja na dzień 09:06, 21 sie 2023
The {{{model}}} Thingsboard Server migration {{{model}}} instruction:
- Firstly you’ve to log in to Elproma Thingsboard with credential received from Elproma.
- Go to Dashboard and click "CHANGE SERVER"
- Enter your Thingsboard Domain and port and click restart all devices
- Go to Dashboard and click "CHANGE SERVER"
- Secondly you need to install Thingsboard on your server. You have two different option:
- Official release from: https://github.com/thingsboard/thingsboard/releases/
- Elproma release (only linux standalone versions) from: LINK. Our release has couple improvements for using with RBVND-Lite: Default "shared attribute" in device importing form. Changes in multiple input widget – possibility to change one parameter in all devices simultaneously.
- Manual for both installation: https://thingsboard.io/docs/user-guide/install/installation-options/
- After installation you need to import your devices list to Thingsboard.
- Go to device menu, click plus sign and "Import device"
- Upload your csv device list file (you receive it from Elproma)

- In second step you need to click "Continue"
-
In third step if you are using official release you need to change all "Server attribute" to "Shared attribute". In Elproma release you can skip this part. Next you have to change "configuration.server.tcp.host" parameter from iot.teleorigin.com to your domain or ip address and after it click "Continue".
- Fourth and fifth step you can skip and click "Continue"
- Go to device menu, click plus sign and "Import device"
- If you need to display live data and EVA-DTS audits you can use our example dashboard.
- Download dashboard from https://cloud.elpromaelectronics.com/index.php/s/nQAxcSkQtqGkD7k
- Go to Dashboard menu, click plus sign and "Import dashboard"
- Select file and click “Import”
- Imported dashboard automatically connect to imported devices and present parameters..


[[Category:{{{model}}} User Manual]]